Facial Plastic Surgery
Gauge earrings have become increasingly popular in the last several years with more and more people undergoing this type of ear piercing. Unfortunately, like many fads, people tend to outgrow this phase of their life and elect to have the gauge earring defect surgically repaired, or closed. This particular page was developed to help those prospective patients better understand what is involved with repair of a gauge earring defect.
- Various Gauge Earring Defects
- The Problem With Gauge Earring Defects
- Repairing A Gauge Earring Defect
- Photo Examples of Ear Gauge Repair
Planning Your Gauge Earlobe Repair*

Average Cost: $3,500
Average Procedure Time: 2 hours
Average Recovery Time: 5 – 7 days
Post-Op Consultation: 2 months
*Procedure pricing and results with Dr. Hilinski may vary. Your personalized treatment plan and pricing will be determined at your consultation appointment.
Various Gauge Earring Defects
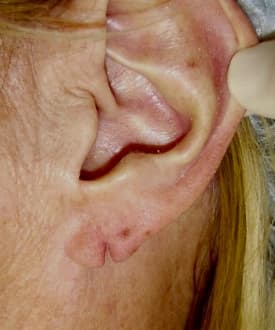
As you might imagine, there are various grades of defects when it comes to gauge earrings. Meaning, some holes from gauge earring use are relatively small given the fact some patients do not attempt to go up in size over time. In others, an increasingly large gauge is placed into the ear, thus creating a significantly larger hole in some cases. The various grades of gauge earring holes is demonstrated visually below ranging from small to medium to large.

The Problem With Gauge Earring Defects
 Regardless of the size of the hole, the commonality with all gauged earring defects is the fact there is a void in actual soft tissue volume. Meaning, there is a hole where normal tissue should reside. Unlike a torn earlobe where the tissue is still there and simply needs to be reconnected, repair of a gauge earring defect means new tissue has to be brought in to close the hole. This comparison is seen visually here. As you will note in the adjacent photo diagram, a torn earlobe can occur without loss of soft tissue. In this particular instance, the tear can be repaired by using the skin that is already present. In contrast, a gauge earring leaves an actual hole in the soft tissue of the earlobe creating an obvious void. In this latter instance, you need to be creative in how you go about closing this type of defect.
 Some people might wonder why you cannot simply suture the hole shut. The reason you cannot do this is because simply trying to close the hole on itself will result in a very abnormal looking earlobe contour.This is shown in the adjacent photo diagram that demonstrates visually what would happen to the earlobe if this was attempted. The photo on the left side is the actual hole shown above. On the right is a computer modified version of the same photo representing how the earlobe would appear if repaired in this manner. If you try to close the hole by just bringing the skin together (along the vertical or long axis of the defect) as shown by the arrows, the earlobe will begin to look distorted and overly narrow with loss of the normal rounded border.
Consequently, a reliable method of repair has to be carefully planned and executed by someone who is experienced in managing this type of cosmetic ear abnormality so the hole can be completely closed with new tissue.
Repairing A Gauge Earring Defect
 As you can now appreciate, repairing a gauge earring defect essentially involves creating new layers of tissue out of thin air. In fact, you need to replace three separate layers of soft tissue in order to properly close this type of defect – this includes (1) the skin covering the outer surface of the earlobe, (2) the middle layer of soft tissue that gives the earlobe shape and form, and (3) the skin covering the backside of the earlobe. So where does this new tissue come from?
In most cases, all three layers of tissue can be recruited from the surrounding areas, which include other regions of the external ear. In plastic surgery jargon, this is referred to as a local flap reconstruction where tissue is taken (borrowed) from one area to be used in the immediate adjacent area to repair a defect, or hole. When it comes to repairing a gauge earring defect, this typically involves taking tissue from the area just behind the hole (away from the face) or from the remaining earlobe skin. My personal preference is to avoid using the remaining earlobe skin if at all possible so that I can minimize further distortion of the already abnormal earlobe contour and shape.
First though, the old hole needs to be de-epithelialized. This is a fancy surgical term that means we have to remove the skin that lines the hole. This is represented in the adjacent photo diagram by the red oval that depicts how the skin lining the gauge hole is cut out. Once this is done, the advancement flap can be planned. In a good number of cases, this involves making what is called a ‘back cut’ (shown by the red hatched line in the adjacent photo) that extends from the bottom of the hole going parallel to the outer border of the earlobe. The red shaded area represents the tissue that is mobilized to close the hole. This entire segment of the earlobe tissue is brought forward (see white/blue arrow) and sutured into position to essentially fill the hole.
What Is Involved With Gauge Earring Hole Surgical Repair?
Repair of a gauge earring hole is most commonly performed under local anesthesia – meaning, patients are fully awake. Some can elect to have a light oral sedative medication, although this is not common. In a majority of these cases, going asleep under a general anesthetic is just not necessary.
My office usually reserves an hour or two to perform the earlobe surgery, depending on whether or not one or both ears are being reshaped and how complex the repair process is for that particular patient.
As long as no sedative medication was taken for the procedure, patients can drive themselves home in most cases.
The sutures (stitches) used to close the skin are usually removed in about 5-6 days. In the meantime, patients are responsible for keeping the sutures clean while taking care of the surgical repair site. Specific instructions are given to you by my staff to help you out in this process.
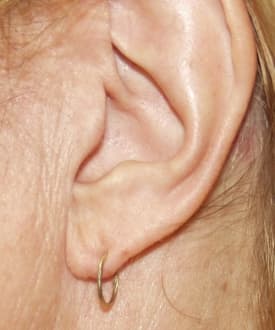
 The adjacent photo shows you what our typical patient looks like at 5-6 days out from this type of gauge earring repair. The sutures, or stitches, used to repair the earlobe can be seen in blue. The earlobe does appear slightly swollen as would be expected following a surgical procedure, but is not grossly distorted as you can see. Even at 5-6 days out from surgery, you can already see the obvious improvement in terms of the earlobe contour and shape – with complete closure of the hole.
Photo Examples of Ear Gauge Repair
We have a fairly extensive gallery of examples of gauged earring repair that can be found in our gallery.
The following are a subset of patient examples showing what many patients can expect following this type of earlobe plastic surgery.
Example 1 Gauge Earring Repair


Example 2 Gauge Earring Repair

Example 3 Gauge Earring Repair
This is another example of gauge earring repair performed under local anesthesia. This particular patient from San Diego decided to get rid of her gauge piercings, but required reshaping of the earlobes to make the ear look more normal. These photos represent her one week result following the surgery. We provide this photo example to show gauge earring repair patients what the surgical site looks like at one week out. Although you will see signs of where the incisions were made to reshape the earlobe, she looks quite presentable in general. As time continues, the incisions will slowly fade away to reveal very little sign that we had repaired the ear.


If you are interested in learning more details about repairing a gauged earlobe, do not hesitate in contacting our office today where we have highly specialized training and experience in managing this niche type of ear plastic surgery.
Dr. John Hilinski has either authored or reviewed and approved this content.